Skip to content
English
  • There are no suggestions because the search field is empty.

How do I record an interview with the StoryCorps App?

In 2022, we launched a new version of our App, this article relates to the latest version. To figure out which version you’re on or get help for Version 1, check out this article!

The StoryCorps App is a free mobile app that guides users through the interview experience from start to finish with easy-to-use tools to help you prepare for your interview and record high-quality conversations on your mobile device. After you record your StoryCorps App interview and publish it to archive.storycorps.org, each interview becomes part of American history in the StoryCorps archive at the American Folklife Center at the Library of Congress.

When you and your partner are ready to record, you’ll find step-by-step instructions and a full tutorial on using the StoryCorps App below.

Tutorial Link: https://ior.ad/8jEX

36 STEPS

1. The first step is to open the app and Create an Account or Sign In to an existing archive.storycorps.org account.

Step 1 image

2. You can also Sign In and Create and Account using your Facebook or Google credentials.

Step 2 image

3. Enter your First Name, Last Name, and Email Address and create a Password.

Step 3 image

4. Enter Your Birthday.

Step 4 image

5. Check the grey box to confirm that you have read and agreed to our Terms of Use.

Step 5 image

6. If you have a Community code, you can enter it now.

Step 6 image

7. Once you've entered all of the required information, select Continue to create your account.

Step 7 image

8. After you login to your account, press the Record button at the bottom of the screen.

Step 8 image

9. Select Prepare My Interview.

Step 9 image

10. Give your interview a Title (you'll have the option to change your interview title later.)

Step 10 image

11. Review the Plan Your Interview checklist. You can check off boxes as you move through and complete the checklist.

Step 11 image

12. Once you’ve completed the checklist and given your interview a title, select Next.

Step 12 image

13. Now you'll have the option to prepare a Custom Question List.

Select questions from one of our prewritten Great Question lists or create your own custom questions.

Step 13 image

14. Once you've chosen your questions, select Review Your Questions.

Step 14 image

15. Review your question list. You can remove questions you've changed your mind about as well as adjust the order the questions appear. After reviewing your list, select Next.

Step 15 image

16. You've prepared your interview! When you are ready to record, select Yes, let's record now!

Step 16 image

17. Select OK to give the StoryCorps App access to your Microphone.

Step 17 image

18. When you and your partner are ready, select the Recording button to begin recording your interview.

Step 18 image

19. Follow the prompts and introduce yourself. If you created a custom question list, you can swipe through it during your conversation.

Step 19 image

20. Once you have finished your conversation, select End recording.

Step 20 image

21. Confirm that you want to end your recording by selecting Yes.

Step 21 image

22. You can listen to your interview to confirm it was successfully recorded.

Step 22 image

23. To finish publishing your interview, select Next.

If you want to record again, select Start Over. If you'd rather publish your interview at a later date, select Save as Draft.

Step 23 image

24. Add a photo of you and your partner to your interview. Select Take photo to take a new picture or Upload photo add an existing picture.

Step 24 image

25. Enter your interview details starting with your Interview Title. You can keep the title you chose previously or rename your interview.

Step 25 image

26. Enter a 1-3 sentence Summary.

Step 26 image

27. Enter your Recording Location

Step 27 image

28. Select Add participant to tag interview participants.

Step 28 image

29. You can include their first and last name and email address. Select Add to finish tagging them.

Step 29 image

30. To add additional participants, select Add participant. You can also edit participant details by selecting Edit.

Step 30 image

31. Tag Your Story with relevant words and phrases. You can tag your interview with General Keywords, Organizations and Places.

Step 31 image

32. After you've finished tagging your story, select Next.

Step 32 image

33. Choose your Privacy Settings. You can choose between Public, StoryCorps Community, and Private to you.

Step 33 image

34. After you've chosen your privacy setting, select Next.

Step 34 image

35. Review your interview infromation for accuracy. When you are ready to publish your interview, select Save to Archive.

Step 35 image

36. That's it! You've successfully recorded and published your interview with the StoryCorps App.

Step 36 image

Here's an interactive tutorial

** Best experienced in Full Screen (click the icon in the top right corner before you begin) **

https://www.iorad.com/player/1982199/How-do-I-record-an-interview-with-the-StoryCorps-App-


  • Download the StoryCorps App to your mobile device
    • Log into the StoryCorps App by creating a new account in the app or by logging into an existing archive.storycorps.org account.
  • Prepare to record your interview
    • Press the Record button (the red microphone icon in the center of the navigation bar on the bottom of the app) and select Prepare My Interview.
        • Please Note: If you don’t want to prepare for your interview in advance, you can select Record Now to begin recording your interview immediately.
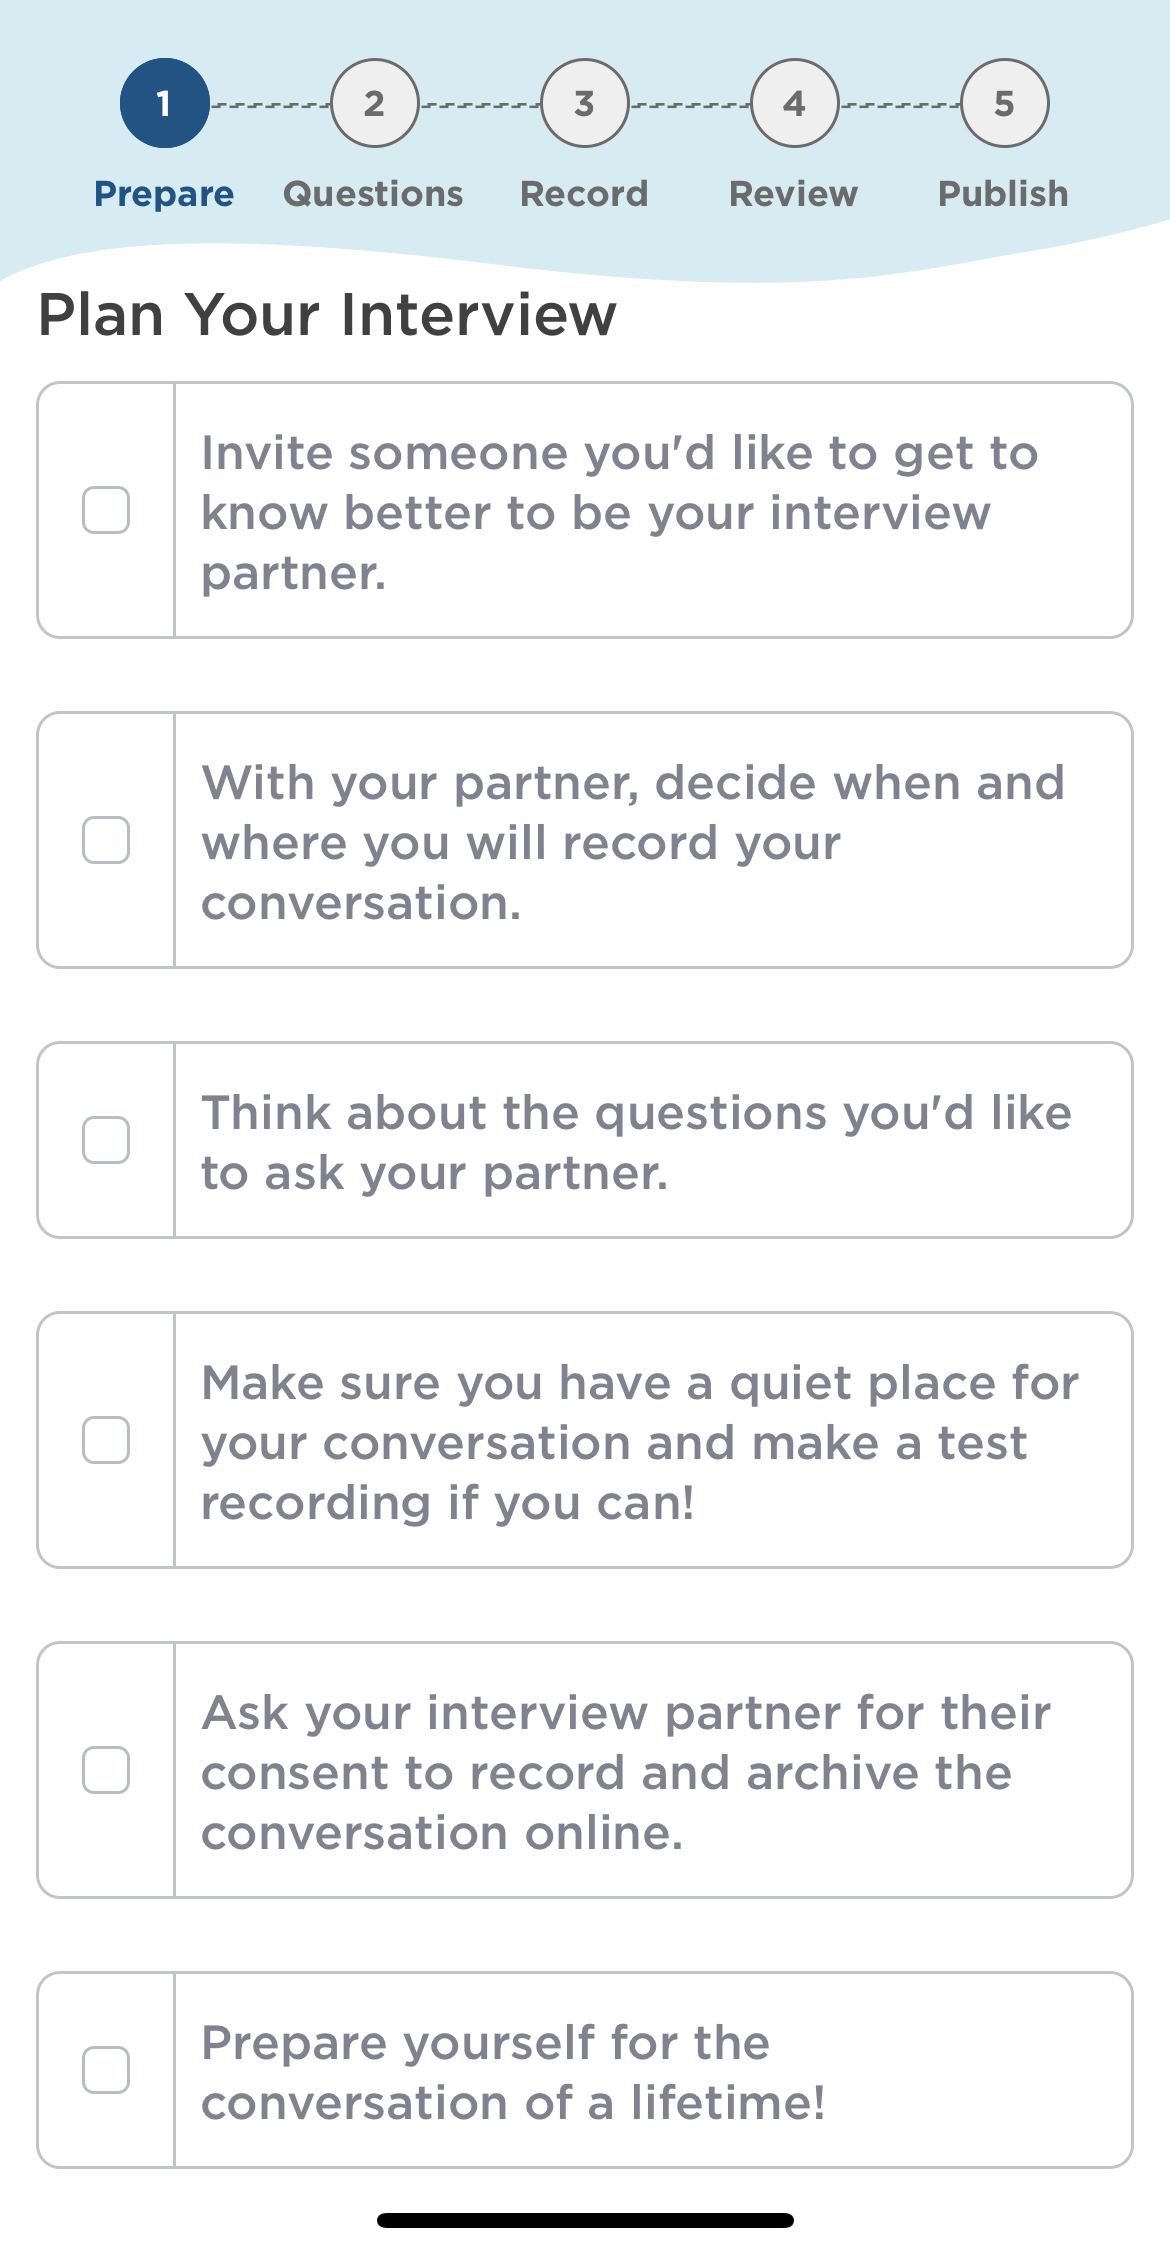
    • Enter an interview title and review the optional Plan Your Interview checklist so you and your interview partner have a game plan before you start recording.

Plan_your_Interview_Checklist.jpeg

      • Once you’ve completed the checklist and given your interview a title, press Next at the bottom of the screen.
  • Prepare your questions
    • Select questions from one of our prewritten Great Question lists or create your own custom questions.
      • You can find more information on creating your custom question list in the StoryCorps App in the Help Center article below.

Preparing a Custom Question List in the StoryCorps App

    • Review your custom question list. You’ll be able to change the order of your questions and remove any questions you no longer want to include on your list.
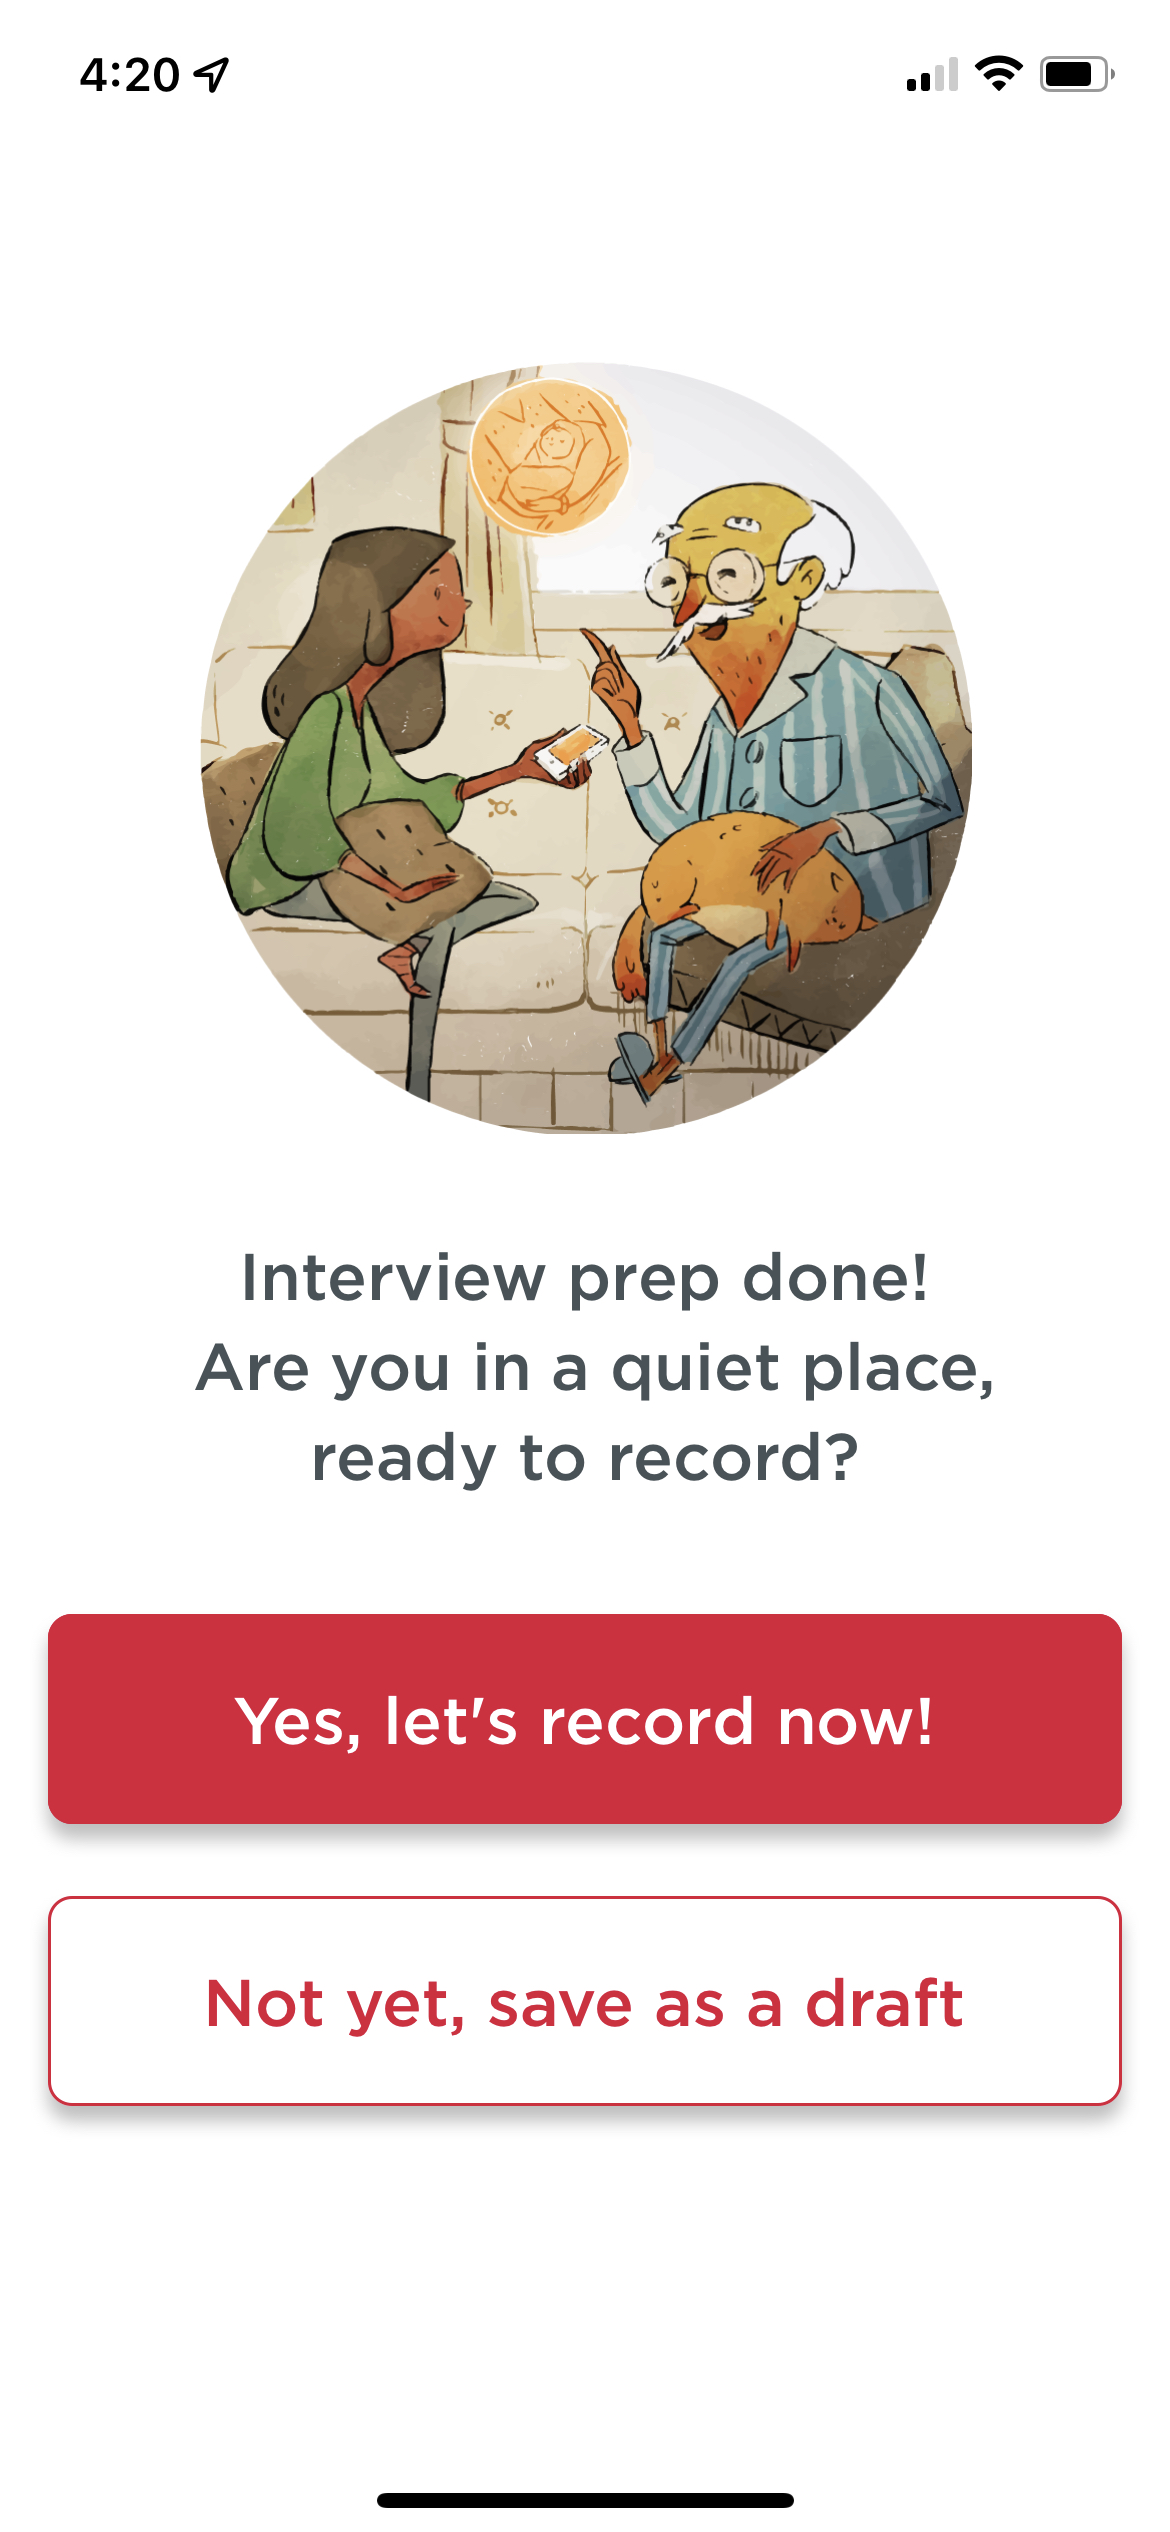
    • After you’ve created and reviewed your custom question list, you can begin recording your interview by selecting Yes, let’s record now! or record at a later time by selecting Not yet, save as a draft.

IMG_EFD17F7742A3-1.jpeg

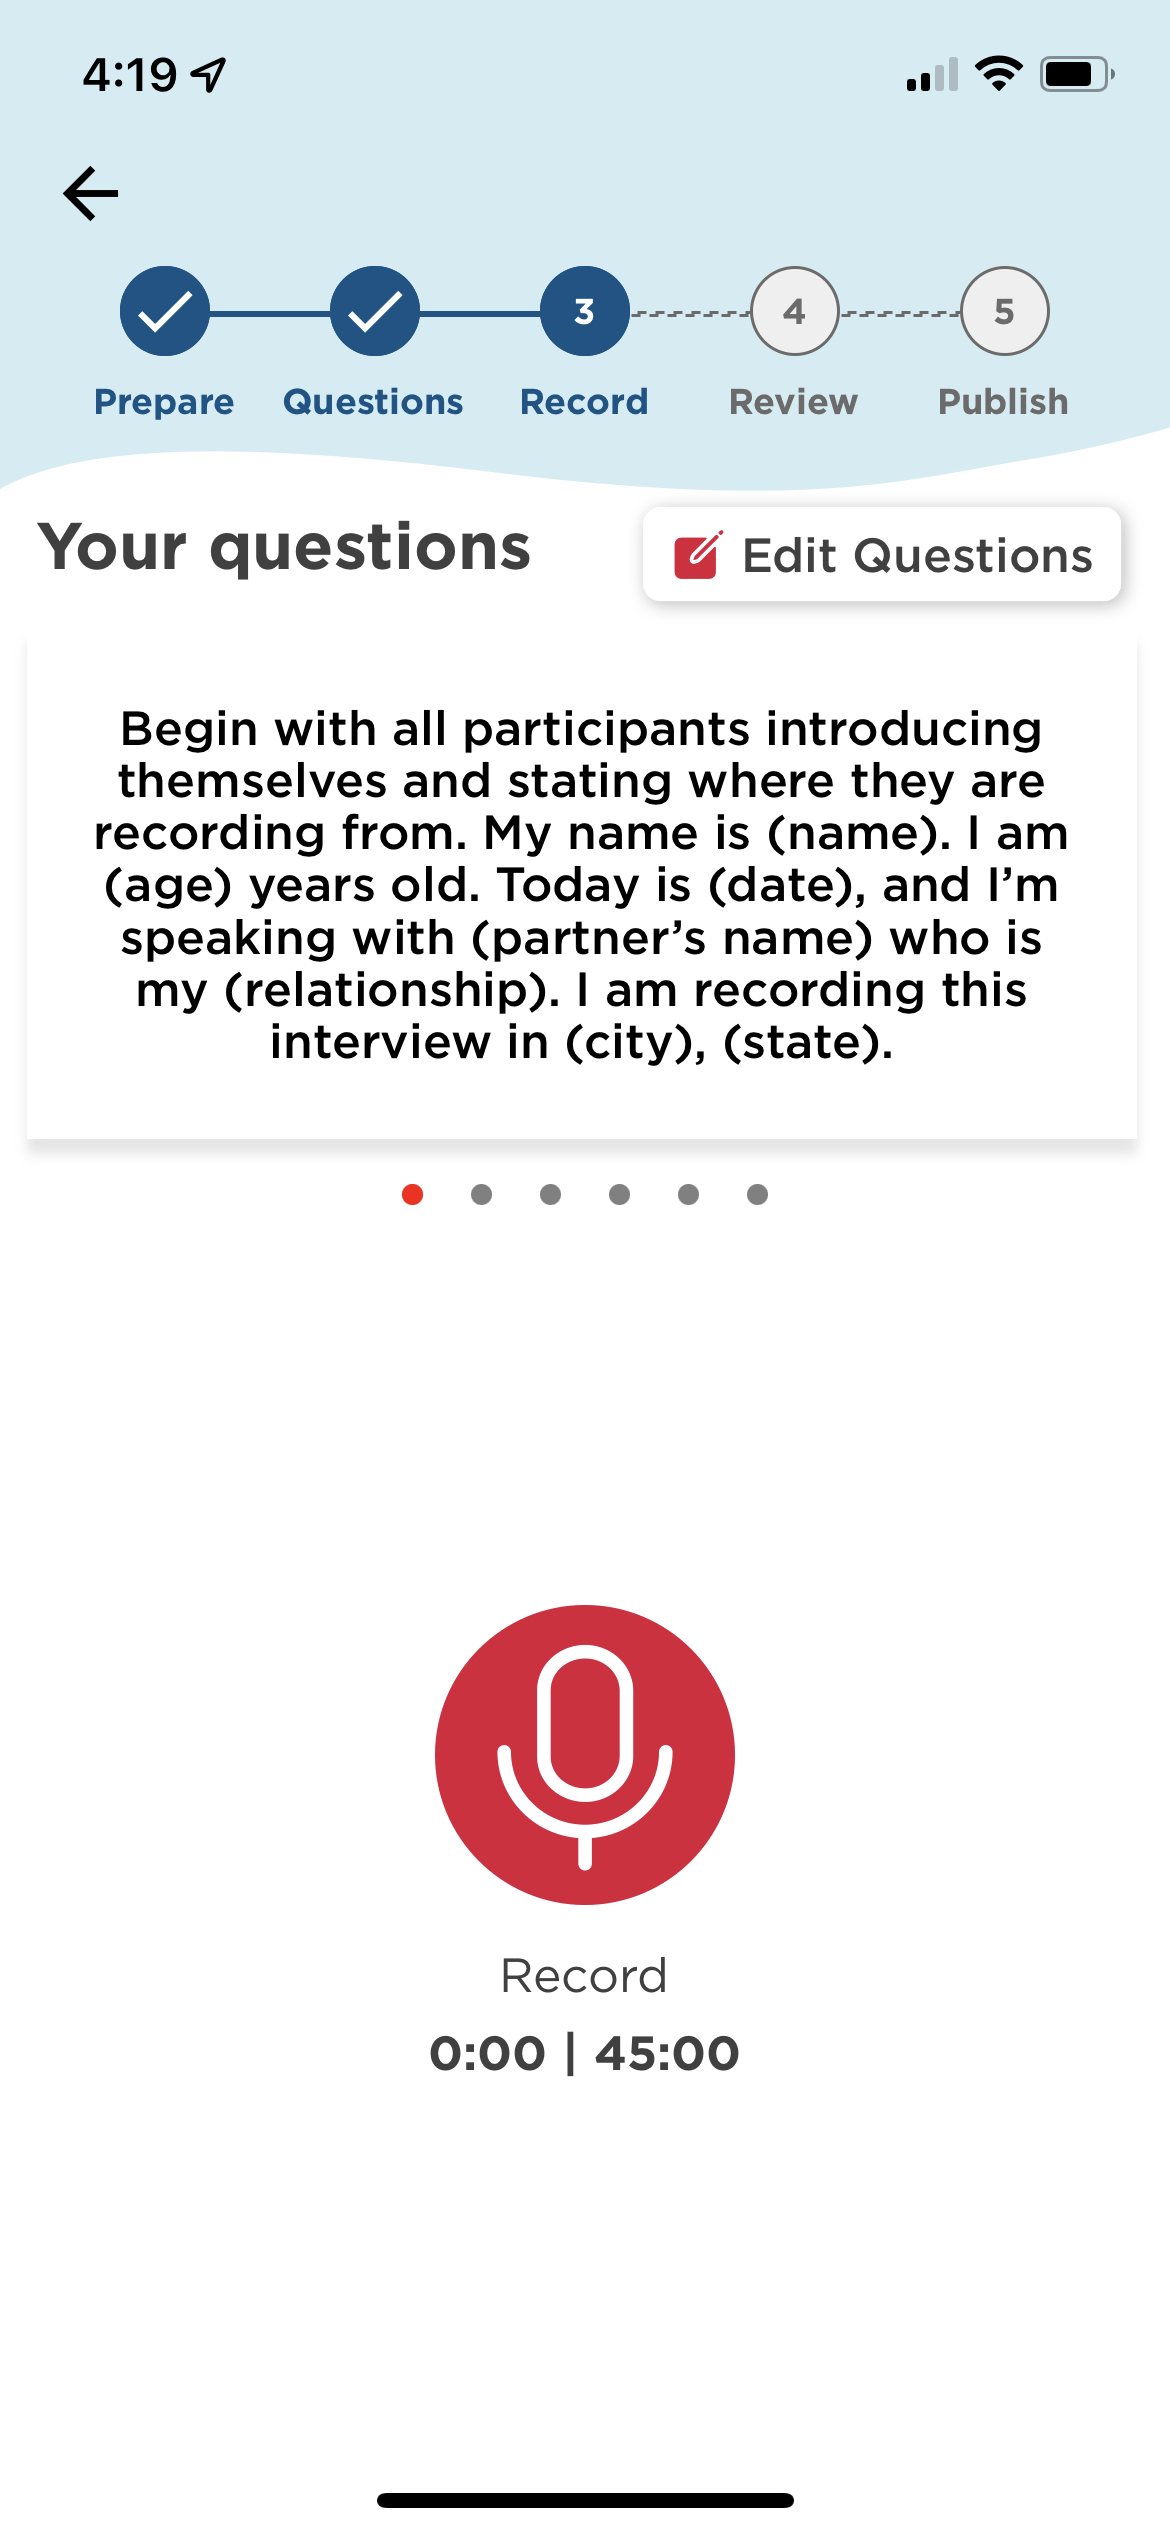
  • Start recording and have a conversation
    • When you and your interview partner are ready, press the red Recording button to begin recording your StoryCorps App interview.

IMG_5F7C119E0EDD-1.jpeg

    • Follow the prompts and introduce yourself. If you created a question list, you can swipe through it during your conversation.
      • Please Note: StoryCorps App interviews have a maximum time limit of 45 minutes and will automatically stop recording at 45 minutes.
    • When you are finished with your interview, select End Recording.
      • Be sure you are completely finished before ending your recording, as there is no way to resume a recording once it has been stopped.
    • Confirm your recording was successful.
      • On the Audio Recorded! screen, listen to some of your interview to confirm there were no issues that prevented any audio from recording.
      • Select Next to continue publishing your interview to archive.storycorps.org, Save as Draft to finish publishing your interview at another time, or Start Over if you want to re-record your interview.
  • Upload a photo and enter your interview details
    • Select a photo to include with your interview on archive.storycorps.org.
    • Once you have added your photo, you will be prompted to fill in the following fields:
      • Interview Title if not yet created
      • Summary (a 1- to 3-sentence interview summary)
      • Recording Location including city, state/province, and country
      • Participants (the names and emails of you and your interview partner[s])
      • Tag Your Story (general keywords, organizations, and places; all interviews must include at least one tag)
    • After you have finished adding your photo and interview information, select Next.
  • Select your privacy settings
    • Select the privacy settings for your interview before uploading it to archive.storycorps.org.
      • You can find more information about the different privacy options for StoryCorps interviews in the Help Center article below.

Are there different privacy and sharing options?

  • Publish your interview to the online archive
    • Review your interview details and photos. Once you have confirmed that all your information is accurate, select Save to Archive to publish your interview to archive.storycorps.org.
      • If you don’t want to publish your interview to archive.storycorps.org, you can find more information about exporting your interview audio from your device in the Help Center article below.

How do I download my interview audio in the StoryCorps App?

  • You're done! Your interview should be accessible and appear on your profile in the StoryCorps App as well as your archive.storycorps.org profile in the “My Interviews and Profile” section.

Still have questions? Submit a request to our support team here.

36 STEPS

1. The first step is to open the app and Create an Account or Sign In to an existing archive.storycorps.org account.

Step 1 image

2. You can also Sign In and Create and Account using your Facebook or Google credentials.

Step 2 image

3. Enter your First Name, Last Name, and Email Address and create a Password.

Step 3 image

4. Enter Your Birthday.

Step 4 image

5. Check the grey box to confirm that you have read and agreed to our Terms of Use.

Step 5 image

6. If you have a Community code, you can enter it now.

Step 6 image

7. Once you've entered all of the required information, select Continue to create your account.

Step 7 image

8. After you login to your account, press the Record button at the bottom of the screen.

Step 8 image

9. Select Prepare My Interview.

Step 9 image

10. Give your interview a Title (you'll have the option to change your interview title later.)

Step 10 image

11. Review the Plan Your Interview checklist. You can check off boxes as you move through and complete the checklist.

Step 11 image

12. Once you’ve completed the checklist and given your interview a title, select Next.

Step 12 image

13. Now you'll have the option to prepare a Custom Question List.

Select questions from one of our prewritten Great Question lists or create your own custom questions.

Step 13 image

14. Once you've chosen your questions, select Review Your Questions.

Step 14 image

15. Review your question list. You can remove questions you've changed your mind about as well as adjust the order the questions appear. After reviewing your list, select Next.

Step 15 image

16. You've prepared your interview! When you are ready to record, select Yes, let's record now!

Step 16 image

17. Select OK to give the StoryCorps App access to your Microphone.

Step 17 image

18. When you and your partner are ready, select the Recording button to begin recording your interview.

Step 18 image

19. Follow the prompts and introduce yourself. If you created a custom question list, you can swipe through it during your conversation.

Step 19 image

20. Once you have finished your conversation, select End recording.

Step 20 image

21. Confirm that you want to end your recording by selecting Yes.

Step 21 image

22. You can listen to your interview to confirm it was successfully recorded.

Step 22 image

23. To finish publishing your interview, select Next.

If you want to record again, select Start Over. If you'd rather publish your interview at a later date, select Save as Draft.

Step 23 image

24. Add a photo of you and your partner to your interview. Select Take photo to take a new picture or Upload photo add an existing picture.

Step 24 image

25. Enter your interview details starting with your Interview Title. You can keep the title you chose previously or rename your interview.

Step 25 image

26. Enter a 1-3 sentence Summary.

Step 26 image

27. Enter your Recording Location

Step 27 image

28. Select Add participant to tag interview participants.

Step 28 image

29. You can include their first and last name and email address. Select Add to finish tagging them.

Step 29 image

30. To add additional participants, select Add participant. You can also edit participant details by selecting Edit.

Step 30 image

31. Tag Your Story with relevant words and phrases. You can tag your interview with General Keywords, Organizations and Places.

Step 31 image

32. After you've finished tagging your story, select Next.

Step 32 image

33. Choose your Privacy Settings. You can choose between Public, StoryCorps Community, and Private to you.

Step 33 image

34. After you've chosen your privacy setting, select Next.

Step 34 image

35. Review your interview infromation for accuracy. When you are ready to publish your interview, select Save to Archive.

Step 35 image

36. That's it! You've successfully recorded and published your interview with the StoryCorps App.

Step 36 image

Here's an interactive tutorial

** Best experienced in Full Screen (click the icon in the top right corner before you begin) **

https://www.iorad.com/player/1982199/How-do-I-record-an-interview-with-the-StoryCorps-App-